目录
本文主要介绍 Kafka 与 Spring 框架整合
六. SpringBoot整合Kafka
1. 在创建好的gradle工程中引入依赖
Gadle版本: 6.0
JDK: 1.8
IDEA: 2020.1
groovydependencies {
    ...
    compile group: 'org.springframework.boot', name: 'spring-boot-starter-web', version:'2.2.0.RELEASE'
    compile group: 'org.springframework.kafka', name: 'spring-kafka', version:'2.3.1.RELEASE'
    ...
}
2. 编写配置文件
配置文件有两种, 第一中是使用application.yml文件配置, 第二中是使用SpringBoot Java配置类来配置,两种配置如下
applacation.yml
yamlserver:
  port: 8080

spring:
  jackson:
    date-format: yyyy-MM-dd HH:mm:ss  #日期序列化格式
  kafka:
    bootstrap-servers: 172.22.24.200:9092, 172.22.24.200:9093, 172.22.24.200:9094 # 集群地址, 任意配一台可用地址即可
    producer: # 生产者配置
      retries: 0 # 重试次数
      batch-size: 16384 # 一次最多发送数据量
      buffer-memory: 33554432 # 32M批处理缓冲区
      key-serializer: org.apache.kafka.common.serialization.StringSerializer # 序列化
      value-serializer: org.apache.kafka.common.serialization.StringSerializer
      linger: # 发送延迟
        ms: 1000
      acks: "1" # 消息确认
    consumer: # 消费者配置
      group-id: 0 # group-id
      enable-auto-commit: false # 是否开启自动提交
      auto-commit-interval: 100 # consumer自动向zookeeper提交offset的频率
      properties: # 消费超时时间,大小不能超过session.timeout.ms,默认:3000
        session:
          timeout:
            ms: 15000
      key-deserializer: org.apache.kafka.common.serialization.StringDeserializer # 反序列化
      value-deserializer: org.apache.kafka.common.serialization.StringDeserializer
      fetch-max-wait: 300000 # 配置consumer最多等待response多久
      max-poll-records: 50 # max.poll.records条数据需要在session.timeout.ms这个时间内处理完
KafkaConfig.java
注意: 配置写在yml和java类中均可, 但是某些工厂类如KafkaTemplate则需要在代码中使用@Bean注解交给Spring创建
javapackage com.gsafety.springbootkafka.config;


import lombok.extern.slf4j.Slf4j;
import org.apache.kafka.clients.consumer.ConsumerConfig;
import org.apache.kafka.clients.producer.ProducerConfig;
import org.apache.kafka.common.serialization.StringDeserializer;
import org.apache.kafka.common.serialization.StringSerializer;
import org.springframework.beans.factory.annotation.Value;
import org.springframework.context.annotation.Bean;
import org.springframework.context.annotation.Configuration;
import org.springframework.kafka.annotation.EnableKafka;
import org.springframework.kafka.config.ConcurrentKafkaListenerContainerFactory;
import org.springframework.kafka.config.KafkaListenerContainerFactory;
import org.springframework.kafka.core.*;
import org.springframework.kafka.listener.ContainerProperties;

import java.util.HashMap;
import java.util.Map;

/**
 * @author lg
 * @Classname KafkaConfig
 * @Description
 * @Date 2020-06-29 17:12
 */
@Slf4j
@EnableKafka
@Configuration
public class KafkaConfig {
    @Value("${spring.kafka.bootstrap-servers}")
    private String hosts;

    public KafkaConfig() {
        log.info("kafka config init  ------------->");
    }

    /**
     * producer configuration
     *
     * @return Map<String, Object> producerConfigs
     */
    @Bean
    public Map<String, Object> producerConfigs() {
        Map<String, Object> props = new HashMap<>(8);
        props.put(ProducerConfig.BOOTSTRAP_SERVERS_CONFIG, hosts);
        props.put(ProducerConfig.RETRIES_CONFIG, 0);
        props.put(ProducerConfig.BATCH_SIZE_CONFIG, 16384);
        props.put(ProducerConfig.LINGER_MS_CONFIG, 1000);
        props.put(ProducerConfig.BUFFER_MEMORY_CONFIG, 33554432);
        props.put(ProducerConfig.ACKS_CONFIG, "1");
        props.put(ProducerConfig.KEY_SERIALIZER_CLASS_CONFIG, StringSerializer.class);
        props.put(ProducerConfig.VALUE_SERIALIZER_CLASS_CONFIG, StringSerializer.class);
        return props;
    }

    @Bean
    public ProducerFactory<String, String> producerFactory() {
        return new DefaultKafkaProducerFactory<>(producerConfigs());
    }

    /**
     * consumer configuration
     *
     * @return Map<String, Object> consumerConfigs
     */
    @Bean
    public Map<String, Object> consumerConfigs() {
        Map<String, Object> props = new HashMap<>(10);
        props.put(ConsumerConfig.BOOTSTRAP_SERVERS_CONFIG, hosts);
        props.put(ConsumerConfig.GROUP_ID_CONFIG, "0");
        //自动控制提交offset
        props.put(ConsumerConfig.ENABLE_AUTO_COMMIT_CONFIG, false);
        //提交延迟毫秒数
        props.put(ConsumerConfig.AUTO_COMMIT_INTERVAL_MS_CONFIG, 100);
        //执行超时时间
        props.put(ConsumerConfig.SESSION_TIMEOUT_MS_CONFIG, "15000");
        // 每间隔max.poll.interval.ms我们就调用一次poll
        props.put(ConsumerConfig.MAX_POLL_INTERVAL_MS_CONFIG, "300000");
        // 一次poll最多返回的记录数
        props.put(ConsumerConfig.MAX_POLL_RECORDS_CONFIG, "50");
        //开始消费位置 earliest/latest/none
        props.put(ConsumerConfig.AUTO_OFFSET_RESET_CONFIG, "latest");
        props.put(ConsumerConfig.KEY_DESERIALIZER_CLASS_CONFIG, StringDeserializer.class);
        props.put(ConsumerConfig.VALUE_DESERIALIZER_CLASS_CONFIG, StringDeserializer.class);
        return props;
    }

    @Bean
    public ConsumerFactory<String, String> consumerFactory() {
        return new DefaultKafkaConsumerFactory<>(consumerConfigs());
    }

    /**
     * kafka template configuration
     *
     * @return KafkaTemplate<String, String> kafkaTemplate
     */
    @Bean
    public KafkaTemplate<String, String> kafkaTemplate() {
        return new KafkaTemplate<>(producerFactory());
    }

    /**
     * 批量消费
     * MANUAL   当每一批poll()的数据被消费者监听器(ListenerConsumer)处理之后, 手动调用Acknowledgment.acknowledge()后提交
     * @return
     */
    @Bean
    public KafkaListenerContainerFactory<?> batchFactory(ConsumerFactory consumerFactory) {
        ConcurrentKafkaListenerContainerFactory<String, String> factory =
                new ConcurrentKafkaListenerContainerFactory<>();
        factory.setConsumerFactory(consumerFactory);
        // topic有5个分区,为了加快消费将并发设置为5,也就是有5个KafkaMessageListenerContainer
        factory.setConcurrency(5);
        // 设置拉取时间
        factory.getContainerProperties().setPollTimeout(1500);
        // 开启批量消费
        factory.setBatchListener(true);
        //配置手动提交offset

        factory.getContainerProperties().setAckMode(ContainerProperties.AckMode.MANUAL);
        return factory;
    }

}
KafkaAdminConfig
该文件可用来创建topic的相关操作
javapackage com.gsafety.springbootkafka.config;

import com.gsafety.springbootkafka.constant.MyTopic;
import org.apache.kafka.clients.admin.AdminClientConfig;
import org.apache.kafka.clients.admin.NewTopic;
import org.springframework.beans.factory.annotation.Value;
import org.springframework.context.annotation.Bean;
import org.springframework.context.annotation.Configuration;
import org.springframework.kafka.annotation.EnableKafka;
import org.springframework.kafka.core.KafkaAdmin;
import org.springframework.stereotype.Component;

import java.util.HashMap;
import java.util.Map;

/**
 * kafka admin config
 */
@EnableKafka
@Configuration
public class KafkaAdminConfig {
    // yml配置文件中的变量
    @Value("${spring.kafka.bootstrap-servers}")
    private String hosts;

    @Bean
    public KafkaAdmin admin() {
        Map<String, Object> configs = new HashMap<>(1);
        configs.put(AdminClientConfig.BOOTSTRAP_SERVERS_CONFIG, hosts);
        return new KafkaAdmin(configs);
    }

    @Bean
    public NewTopic topic1(){
        // 第一个是参数是topic名字,第二个参数是分区个数
        // 第三个是topic的复制因子个数
        // ----------------->>>>>>>>>>>>>>>当broker个数为1个时会创建topic失败,
        //提示:replication factor: 2 larger than available brokers: 1
        //只有在集群中才能使用kafka的备份功能
        return new NewTopic(MyTopic.TOPIC1, 5, (short) 1);
    }

    @Bean
    public NewTopic topic2(){
        return new NewTopic(MyTopic.TOPIC2, 5, (short) 1);
    }

    @Bean
    public NewTopic topic3(){
        return new NewTopic(MyTopic.TOPIC3, 5, (short) 3);
    }

    @Bean
    public NewTopic topic4(){
        return new NewTopic(MyTopic.TOPIC4, 3, (short) 2);
    }
}
3. 编写Kafka通用工具类
- 可以先创建一个工具类接口, 然后再去实现这个接口
javapackage com.gsafety.springbootkafka.service;

import javafx.util.Pair;
import org.apache.kafka.clients.admin.TopicListing;
import org.springframework.kafka.support.SendResult;
import org.springframework.util.concurrent.ListenableFuture;

import java.util.List;
import java.util.Map;

/**
 * Created with IntelliJ IDEA.
 *
 * @author: lg
 * @Date: 2020/6/20 0020
 * @Time: 11:37
 * @Description: KafkaService
 */
public interface KafkaUtils {
    /**
     * 发送数据到指定的topic中
     *
     * @param topicName topic名称
     * @param msg      数据
     * @return 发送的状态
     */
    Boolean sendDataToTopic(String topicName, String msg);

    /**
     * 发送数据到指定的topic和key中
     *
     * @param topicName topic名称
     * @param key       key
     * @param msg       消息
     * @return 发送状态
     */
    ListenableFuture<SendResult<String, String>> sendDataToTopicAndKey(String topicName, String key, String msg);

    /**
     * 发送数据到指定的topic的中
     *
     * @param topic     topic名称
     * @param partition 分区名称
     * @param key       指定的key
     * @param msg       消息
     * @return 发送状态
     */
    ListenableFuture<SendResult<String, String>> sendDataToTopicAppointPartition(String topic, Integer partition, String key, String msg);

    /**
     * 校验topic是否已经存在于kafka中
     *
     * @param topicName topic的名称
     * @return 是否存在的状态
     */
    Boolean isExistTopic(String topicName);

     /**
     * 创建指定的topic
     *
     * @param topicName         topic的名称
     * @param topicPartition    话题创建的分区
     * @param replicationFactor 话题创建的副本, 不能大于broker的数量
     * @return 是否创建成功
     */
    Boolean createTopic(String topicName, Integer topicPartition, short replicationFactor);

    /**
     * 删除话题
     * @param topicNames 话题名称
     * @return 删除结果
     */
    List<Pair<String, Boolean>> deleteTopic(String[] topicNames);

    /**
     * 获取所有的topic
     * @return topic集合
     */
    Map<String, TopicListing> getTopics();

    ...
}
- 实现类
javapackage com.gsafety.springbootkafka.service.impl;

import com.gsafety.springbootkafka.config.KafkaConfig;
import com.gsafety.springbootkafka.service.KafkaUtils;
import javafx.util.Pair;
import lombok.extern.slf4j.Slf4j;
import org.apache.kafka.clients.admin.*;
import org.apache.kafka.common.KafkaFuture;
import org.springframework.beans.factory.annotation.Autowired;
import org.springframework.kafka.core.KafkaAdmin;
import org.springframework.kafka.core.KafkaTemplate;
import org.springframework.kafka.support.SendResult;
import org.springframework.stereotype.Component;
import org.springframework.util.concurrent.ListenableFuture;

import java.util.*;

/**
 * Created with IntelliJ IDEA.
 *
 * @author: lg
 * @Date: 2020/6/20 0020
 * @Time: 20:20
 * @Description: Kafka封装操作类
 */
@Component
@Slf4j
public class KafkaUtilsImpl implements KafkaUtils {

    @Autowired
    private KafkaTemplate<String, String> kafkaTemplate;

    @Autowired
    private KafkaConfig kafkaConfig;

    @Autowired
    private KafkaAdmin kafkaAdmin;

    public void setTimeout(int timeout) {
        this.timeout = timeout;
    }

    private int timeout = 6000;

    /**
     * 发送数据到指定的topic中
     *
     * @param topicName topic名称
     * @param msg       数据
     * @return 发送的状态
     */
    @Override
    public Boolean sendDataToTopic(String topicName, String msg) {
        try {
            ListenableFuture<SendResult<String, String>> result = kafkaTemplate.send(topicName, msg);
            result.get();
            return !result.completable().isCompletedExceptionally();
        } catch (Exception e) {
            log.info("发送普通消息失败, topic={}, msg={}, failure Message={}", topicName, msg, e.getMessage());
            return false;
        }
    }

    /**
     * 发送数据到指定的topic和key中
     *
     * @param topicName topic名称
     * @param key       key
     * @param msg       消息
     * @return 发送状态
     */
    @Override
    public ListenableFuture<SendResult<String, String>> sendDataToTopicAndKey(String topicName, String key, String msg) {
        return kafkaTemplate.send(topicName, key, msg);
    }

    /**
     * 发送数据到指定的topic的中
     *
     * @param topic     topic名称
     * @param partition 分区名称
     * @param key       指定的key
     * @param msg       消息
     * @return 发送状态
     */
    @Override
    public ListenableFuture<SendResult<String, String>> sendDataToTopicAppointPartition(String topic, Integer partition, String key, String msg) {
        return kafkaTemplate.send(topic, partition, key, msg);
    }

    /**
     * 校验topic是否已经存在于kafka中
     *
     * @param topicName topic的名称
     * @return 是否存在的状态
     */
    @Override
    public Boolean isExistTopic(String topicName) {
        try (AdminClient adminClient = AdminClient.create(kafkaAdmin.getConfig())) {
            ListTopicsOptions listTopicsOptions = new ListTopicsOptions();
            listTopicsOptions.listInternal(true);
            ListTopicsResult listTopicsResult = adminClient.listTopics(listTopicsOptions);
            Boolean flag = listTopicsResult.names().get().contains("topicName");
            return flag;
        } catch (Exception e) {
            log.info("校验topic: {} 是否已经存在于kafka中异常 {}", topicName, e.getMessage());
            return false;
        }
    }

    /**
     * 创建指定的topic
     *
     * @param topicName         topic的名称
     * @param topicPartition    话题创建的分区
     * @param replicationFactor 话题创建的副本, 不能大于broker的数量
     * @return 是否创建成功
     */
    @Override
    public Boolean createTopic(String topicName, Integer topicPartition, short replicationFactor) {
        try (AdminClient adminClient = AdminClient.create(kafkaAdmin.getConfig())) {
            Boolean existTopic = isExistTopic(topicName);
            if (existTopic) {
                return existTopic;
            }
            NewTopic newTopic = new NewTopic(topicName, topicPartition, replicationFactor);
            List<NewTopic> newTopics = Collections.singletonList(newTopic);
            adminClient.createTopics(newTopics);
            return isExistTopic(topicName);
        } catch (Exception e) {
            log.error("创建话题{}失败, Cause by: {}", topicName, e.getMessage());
            return false;
        }
    }

    /**
     * 删除指定topic(如果broker那没有设置允许删除topic的话,此调用会持续等待最终超时返回)
     *
     * @param topicNames 待删除的topic
     * @return 删除是否成功
     */
    @Override
    public List<Pair<String, Boolean>> deleteTopic(String[] topicNames) {
        List<Pair<String, Boolean>> result = new ArrayList<>();
        try (AdminClient adminClient = AdminClient.create(kafkaAdmin.getConfig())) {
            DeleteTopicsOptions options = new DeleteTopicsOptions();
            options.timeoutMs(timeout);
            DeleteTopicsResult deleteTopicsResult = adminClient.deleteTopics(Arrays.asList(topicNames), options);
            for (Map.Entry<String, KafkaFuture<Void>> e : deleteTopicsResult.values().entrySet()) {
                String topic = e.getKey();
                KafkaFuture<Void> future = e.getValue();
                future.get();
                result.add(new Pair<>(topic, !future.isCompletedExceptionally()));
            }
            return result;
        } catch (Exception e) {
            log.error("删除话题{}失败, Cause by: {}", String.join(",", topicNames), e.getMessage());
            return result;
        }
    }

    /**
     * 获取所有的topic
     *
     * @return topic集合
     */
    @Override
    public Map<String, TopicListing> getTopics() {
        ListTopicsOptions options = new ListTopicsOptions();
        //设置超时时间
        options.timeoutMs(timeout);
        //不列出kafka内部topic
        options.listInternal(false);
        try (AdminClient adminClient = AdminClient.create(kafkaAdmin.getConfig())) {
            ListTopicsResult listTopicsResult = adminClient.listTopics(options);
            return listTopicsResult.namesToListings().get();
        } catch (Exception e) {
            log.error("查询话题失败失败, Cause by: {}", e.getMessage());
            return null;
        }
    }
}
注: @Slf4j注解是集成了lombok后可以方便打印日志使用的
4. 编写Kafka producer
通用工具类编写好后, 可以独立出专门用来发送消息的producer类, 代码如下
javapackage com.gsafety.springbootkafka.producer;

import com.alibaba.fastjson.JSON;
import com.gsafety.springbootkafka.constant.MyTopic;
import com.gsafety.springbootkafka.entity.KafkaMessage;
import com.gsafety.springbootkafka.service.KafkaUtils;
import lombok.extern.slf4j.Slf4j;
import org.springframework.beans.factory.annotation.Autowired;
import org.springframework.kafka.support.SendResult;
import org.springframework.stereotype.Component;
import org.springframework.util.concurrent.ListenableFuture;

import java.util.Objects;
import java.util.concurrent.CompletableFuture;
import java.util.concurrent.ExecutionException;
import java.util.concurrent.atomic.AtomicInteger;

/**
 * @author lg
 * @Classname KafkaProducer
 * @Description 生产者
 * @Date 2020-06-30 11:00
 */
@Slf4j
@Component
public class KafkaProducer {
    @Autowired
    private KafkaUtils kafkaUtils;

    public void send(String topic, String key, KafkaMessage kafkaMessage) {
        String msg = JSON.toJSONString(kafkaMessage);
        kafkaUtils.sendDataToTopicAndKey(topic, key, msg).addCallback(success -> {
            // 消息发送到的topic
            String successTopic = Objects.requireNonNull(success).getRecordMetadata().topic();
            // 消息发送到的分区
            int partition = success.getRecordMetadata().partition();
            // 消息在分区内的offset
            long offset = success.getRecordMetadata().offset();
            log.info("发送普通消息, topic={},key={},msg={}", topic, key, msg);
        }, failure -> {
            log.info("发送普通消息失败, topic={},key={},msg={}, failure Message={}", topic, key, msg, failure.getMessage());
        });
    }

    public boolean send(String topic, Integer partition, String key, KafkaMessage kafkaMessage) {
        // 或者 JSON.toJSONString(kafkaMessage, SerializerFeature.WriteDateUseDateFormat);
        String msg = JSON.toJSONStringWithDateFormat(kafkaMessage, "yyyy-MM-dd HH:mm:ss");
        try {
            ListenableFuture<SendResult<String, String>> sendResultListenableFuture = kafkaUtils.sendDataToTopicAppointPartition(topic, partition, key, msg);
            log.info("发送普通消息,topic={},key={},msg={}", topic, key, msg);
            CompletableFuture<SendResult<String, String>> completable = sendResultListenableFuture.completable();
            completable.get();
            return !completable.isCompletedExceptionally();
        } catch (Exception e) {
            log.error("发送普通消息失败,topic={},key={},msg={}", topic, key, msg);
            return false;
        }
    }

    public void send(String topic, Integer partition, String key, String kafkaMessage) {
        kafkaUtils.sendDataToTopicAppointPartition(topic, partition, key, kafkaMessage);
        log.info("发送普通消息,topic={},key={},msg={}", topic, key, kafkaMessage);
    }
}
- 首先将
KafkaUtils自动注入。 - 然后就可以使用
KafkaUtils中提供的API按照自己的需求进行二次封装,实现自己想要的逻辑处理。 - 发送消息后,可以通过其
addCallback方法来处理发送成功或者失败后的逻辑,或者接收ListenableFuture类型的返回值并且使用try-catch来作逻辑判断,上述两种方式在代码中均有体现。
5. 编写Kafka consumer
consumer主要利用SpringBoot 提供的@KafkaListener注解来实现的。下面先来简单介绍一下@KafkaListener注解的相关内容:
java...
@Target({ ElementType.TYPE, ElementType.METHOD, ElementType.ANNOTATION_TYPE })
@Retention(RetentionPolicy.RUNTIME)
@MessageMapping
@Documented
@Repeatable(KafkaListeners.class)
public @interface KafkaListener {
    // 消费者的id(唯一),当GroupId没有被配置的时候,默认id为GroupId,支持SpEL表达式#{}
    String id() default "";
    // 这里面配置的是监听容器工厂BeanName,常用于批量消费时指定消费工厂
    String containerFactory() default "";
    // 需要监听的Topic,可监听多个
    String[] topics() default {};
    // 可配置更加详细的监听信息,必须监听某个Topic中的指定分区,或者从offset为200的偏移量开始监听
    TopicPartition[] topicPartitions() default {};
    // 监听异常处理器,配置BeanName
    String errorHandler() default "";
    // 消费组ID
    String groupId() default "";
    // id是否为GroupId
    boolean idIsGroup() default true;
    // 消费者Id前缀
    String clientIdPrefix() default "";
    // 真实监听容器的BeanName,需要在 BeanName前加 "__"
    String beanRef() default "__listener";
    ...
}
实现consumer类
javapackage com.gsafety.springbootkafka.consumer;


import lombok.extern.slf4j.Slf4j;
import org.apache.kafka.clients.consumer.ConsumerRecord;
import org.springframework.kafka.annotation.KafkaListener;
import org.springframework.kafka.annotation.PartitionOffset;
import org.springframework.kafka.annotation.TopicPartition;
import org.springframework.kafka.support.Acknowledgment;
import org.springframework.stereotype.Component;

import java.util.List;
import java.util.Optional;

/**
 * @author lg
 * @Classname KafkaConsumer
 * @Description 消费者
 * @Date 2019-11-06 17:01
 */
@Component
@Slf4j
public class KafkaConsumer {
    /**
     * 消费者要从头开始消费某个topic的全量数据,需要满足2个条件(spring-kafka);
     * (1)使用一个全新的"group.id"(就是之前没有被任何消费者使用过);
     * (2)指定"auto.offset.reset"参数的值为earliest;
     * @param content 消息内容
     */
    @KafkaListener(id = "client-1", topics = "topic4", groupId = "group2")
    public void processMessage2(String content) {
        log.info("消费者topic4-1监听消息,消息内容=[{}]", content);s
    }

    @KafkaListener(id = "client-2", topics = "topic4", groupId = "group2")
    public void processMessage3(String content) {
        log.info("消费者topic4-2监听消息,消息内容=[{}]", content);
    }

    /**
     * 批量消费
     * containerFactory: 需要声明消费工厂名
     * batchFactory: 在KafakaConfig中配置的消费者工厂类
     *
     * @param ack 消息确认对象
     * @param records 消息内容
     */
    @KafkaListener(id = "client-3", topics = "topic3", groupId = "group1",
            containerFactory = "batchFactory")
    public void processMessage(List<ConsumerRecord<?, ?>> records, Acknowledgment ack) {
        log.info("client-3 开始监听消息, Thread ID: {}, records size: {}", Thread.currentThread().getId(), records.size());
        try {
            for (ConsumerRecord<?, ?> record : records) {
                Optional<?> kafkaMessage = Optional.ofNullable(record.value());
                if (kafkaMessage.isPresent()) {
                    Object message = record.value();
                    String topic = record.topic();
                    long offset = record.offset();
                    log.info("client-3监听消息,topic={}, offset={}, 消息内容=[{}]", topic, offset, message);
                }
            }
            // 手动提交,设置offset
            ack.acknowledge();
        } catch (Exception e) {
            log.error("client-3监听异常{}", e.getMessage(), e);
        }
    }

    /**
     * id是消费者监听容器
     * 配置topic和分区:监听两个topic,分别为topic1、topic2,topic1只接收分区0,3的消息,
     * topic2接收分区0和分区1的消息,但是分区1的消费者初始位置为5
     *
     * @param record 消费内容
     */
    @KafkaListener(id = "client-4", clientIdPrefix = "my",
            topicPartitions =
                    {@TopicPartition(topic = "topic1", partitions = {"0", "3"}),
                            @TopicPartition(topic = "topic2", partitions = "0",
                                    partitionOffsets = @PartitionOffset(partition = "1", initialOffset = "4"))
                    })
    public void listen(ConsumerRecord<?, ?> record) {
        log.info("topic1消息监听,topic={},key={},value={}", record.topic(), record.key(), record.value());
    }

    @KafkaListener(id = "client-5", topics = {"topic1", "topic2"})
    public void listen2(ConsumerRecord<?, ?> record) {
        log.info("topic1,topic2 多主题消息监听,topic={},key={},value={}", record.topic(), record.key(), record.value());

    }
}
至此,我们的生产者和消费者就已经都编写好了,至于要简单的编写一下单元测试或者Controller实现RESTful API就可以开始验证和简单的使用Kafka了。
6. 测试
启动
java...
2020-06-30 15:38:20.332  INFO 20320 --- [  topic-3-2-C-1] o.s.k.l.KafkaMessageListenerContainer    : group1: partitions assigned: [topic3-4]
2020-06-30 15:38:20.336  INFO 20320 --- [  topic-3-1-C-1] o.s.k.l.KafkaMessageListenerContainer    : group1: partitions assigned: [topic3-3, topic3-2]
2020-06-30 15:38:20.336  INFO 20320 --- [  topic-3-0-C-1] o.s.k.l.KafkaMessageListenerContainer    : group1: partitions assigned: [topic3-1, topic3-0]
...
在消费工厂或者配置中设置并发量,小于或等于Topic的分区数
factory.setConcurrency(3);
我们设置concurrency为3,也就是将会启动3条线程进行监听,我们创建的topic则是有5个partition,意味着将有2条线程分配到2个partition和1条线程分配到1个partition。我们可以看到这段日志的最后3行,这就是每条线程分配到的partition. 注意:设置的并发量不能大于partition的数量,如果需要提高吞吐量,可以通过增加partition的数量达到快速提升吞吐量的效果。
1. 简单发送-订阅
发送:
java/**
 * 发送数据到指定的topic的中
 *
 * @param topic     topic名称
 * @param partition 分区名称
 * @param key       指定的key
 * @param msg       消息
 * @return 发送状态
*/
public void send(String topic, String key, KafkaMessage kafkaMessage) {
    String msg = JSON.toJSONString(kafkaMessage);
    kafkaUtils.sendDataToTopicAndKey(topic, key, msg);
}
订阅:
java/**
 * 消费者要从头开始消费某个topic的全量数据,需要满足2个条件(spring-kafka);
 * (1)使用一个全新的"group.id"(就是之前没有被任何消费者使用过);
 * (2)指定"auto.offset.reset"参数的值为earliest;
 *
 * @param content 消息内容
 */
@KafkaListener(id = "topic4-1", topics = "topic4", groupId = "group2")
public void processMessage2(String content) {
    log.info("消费者topic4-1监听消息,消息内容=[{}]", content);
}
控制台结果:

2. 批量消费
-
重新创建一份新的消费者配置,配置为一次拉取5条消息
-
创建一个监听容器工厂,设置其为批量消费并设置并发量为5,这个并发量根据分区数决定,必须小于等于分区数,否则会有线程一直处于空闲状态
-
创建一个分区数为5的Topic
-
创建监听方法,设置消费
id为batch,clientID前缀为batch,监听topic3,使用batchFactory工厂创建该监听容器
该方法在KafkaConfig.java中
java...
/**
 * 批量消费
 * @return
 */
@Bean
public ConcurrentKafkaListenerContainerFactory<String, String> batchFactory() {
    ConcurrentKafkaListenerContainerFactory<String, String> factory =
            new ConcurrentKafkaListenerContainerFactory<>();
    factory.setConsumerFactory(new DefaultKafkaConsumerFactory<>(consumerConfigs()));
    //设置并发量,小于或等于Topic的分区数
    factory.setConcurrency(3);
    // 开启批量消费
    factory.setBatchListener(true);
    return factory;
}
...
生产者代码:
java@ApiOperation(value = "向Topic3中发送消息", notes="向Topic3中发送消息")
@PostMapping(path = "/topic3")
public ResponseEntity<Boolean> sendTopic3(@RequestBody KafkaMessage kafkaMessage) {
    boolean flag = false;
    for (int i = 0; i < 5; i++) {
        flag = kafkaProducer.send(MyTopic.TOPIC3, 2, "topic.*", kafkaMessage);
    }
    return ResponseEntity.ok(flag);
}
消费者代码:
java/**
 * 批量消费
 * containerFactory: 需要声明消费工厂名
 *
 * @param records 消息内容
 */
@KafkaListener(id = "topic-3", topics = "topic3", groupId = "group1",
        containerFactory = "batchFactory", clientIdPrefix = "batch")
public void processMessage(List<ConsumerRecord<?, ?>> records) {
    log.info("topic-3 开始监听消息, Thread ID: {}, records size: {}", Thread.currentThread().getId(), records.size());
    try {
        for (ConsumerRecord<?, ?> record : records) {
            Optional<?> kafkaMessage = Optional.ofNullable(record.value());
            if (kafkaMessage.isPresent()) {
                Object message = record.value();
                String topic = record.topic();
                long offset = record.offset();
                log.info("topic-3监听消息,topic={}, offset={}, 消息内容=[{}]", topic, offset, message);
            }
        }
    } catch (Exception e) {
        log.error("topic-3监听异常{}", e.getMessage(), e);
    }
}
控制台结果:max.poll.records设置为5(一次poll最多返回的记录数)

3. 确认机制
与2. 批量消费的代码相似,使用Kafka的Ack机制比较简单,只需简单的三步即可:
- 设置ENABLE_AUTO_COMMIT_CONFIG=false,禁止自动提交
- 设置AckMode=MANUAL_IMMEDIATE
- 监听方法加入Acknowledgment ack 参数
Kafka是通过最新保存偏移量进行消息消费的,而且确认消费的消息并不会立刻删除,所以我们可以重复的消费未被删除的数据,当第一条消息未被确认,而第二条消息被确认的时候,Kafka会保存第二条消息的偏移量,也就是说第一条消息再也不会被监听器所获取,除非是根据第一条消息的偏移量手动获取。
拒绝消息只要在监听方法中不调用ack.acknowledge()即可
配置:
java...
/**
 * 批量消费
 * @return
 */
@Bean
public ConcurrentKafkaListenerContainerFactory<String, String> batchFactory() {
    ConcurrentKafkaListenerContainerFactory<String, String> factory =
            new ConcurrentKafkaListenerContainerFactory<>();
    factory.setConsumerFactory(new DefaultKafkaConsumerFactory<>(consumerConfigs()));
    //设置并发量,小于或等于Topic的分区数
    factory.setConcurrency(3);
    // 开启批量消费
    factory.setBatchListener(true);
    //配置手动提交offset
    factory.getContainerProperties().setAckMode(ContainerProperties.AckMode.MANUAL);
    return factory;
}

/**
 * consumer configuration
 *
 * @return Map<String, Object> consumerConfigs
 */
@Bean
public Map<String, Object> consumerConfigs() {
    Map<String, Object> props = new HashMap<>(10);
    ...
    //自动控制提交offset,注意此处设置自动提交为false的意思时offset从由kafka自动提交转为由Spring自动提交了,实现真正的手动提交还需要在消费工厂类中配合factory.getContainerProperties().setAckMode(ContainerProperties.AckMode.MANUAL);或者kafka-listener-ack-mode: manual 参数配置, 才能实现真正的手动提交
    props.put(ConsumerConfig.ENABLE_AUTO_COMMIT_CONFIG, false);
    ...
    return props;
}
...
消费者代码:
java/**
 * 批量消费
 * containerFactory: 需要声明消费工厂名
 *
 * @param records 消息内容
 */
@KafkaListener(id = "topic-3", topics = "topic3", groupId = "group1",
        containerFactory = "batchFactory", clientIdPrefix = "batch")
public void processMessage(List<ConsumerRecord<?, ?>> records, Acknowledgment ack) {
    log.info("topic-3 开始监听消息, Thread ID: {}, records size: {}", Thread.currentThread().getId(), records.size());
    try {
        for (ConsumerRecord<?, ?> record : records) {
            Optional<?> kafkaMessage = Optional.ofNullable(record.value());
            if (kafkaMessage.isPresent()) {
                Object message = record.value();
                String topic = record.topic();
                long offset = record.offset();
                log.info("topic-3监听消息,topic={}, offset={}, 消息内容=[{}]", topic, offset, message);
            }
        }
        // 手动提交,设置offset, 确认消息被消费
        ack.acknowledge();
    } catch (Exception e) {
        log.error("topic-3监听异常{}", e.getMessage(), e);
    }
}
编写测试方法,运行后可以方法监听方法能收到消息,紧接着注释ack.acknowledge()方法,重新测试,同样你会发现监听容器能接收到消息,这个时候如果你重启项目还是可以看到未被确认的那几条消息。
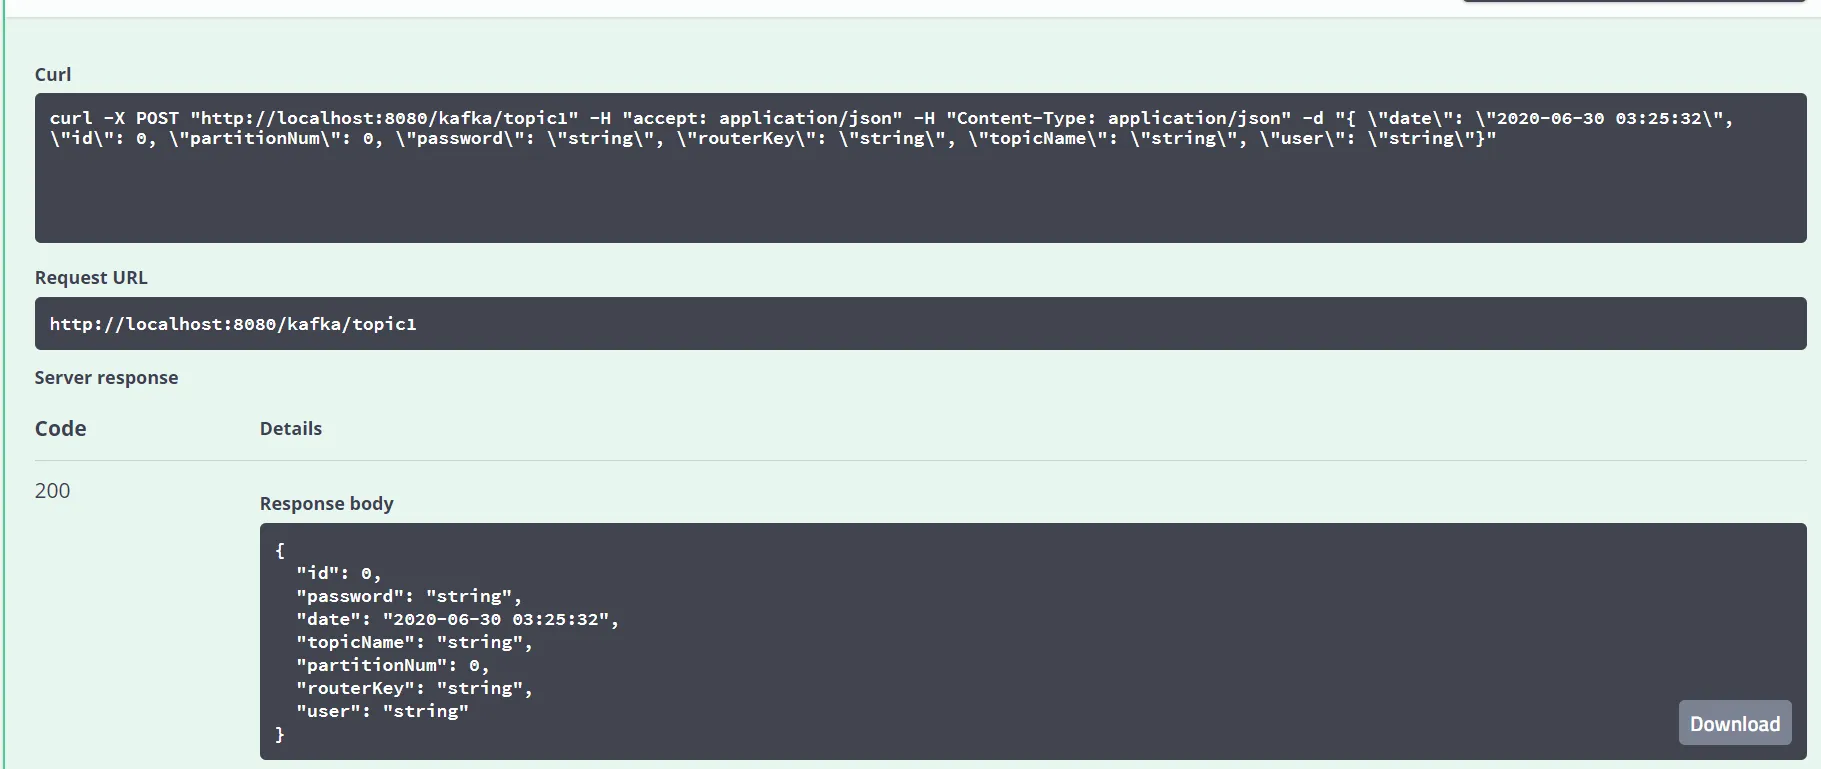
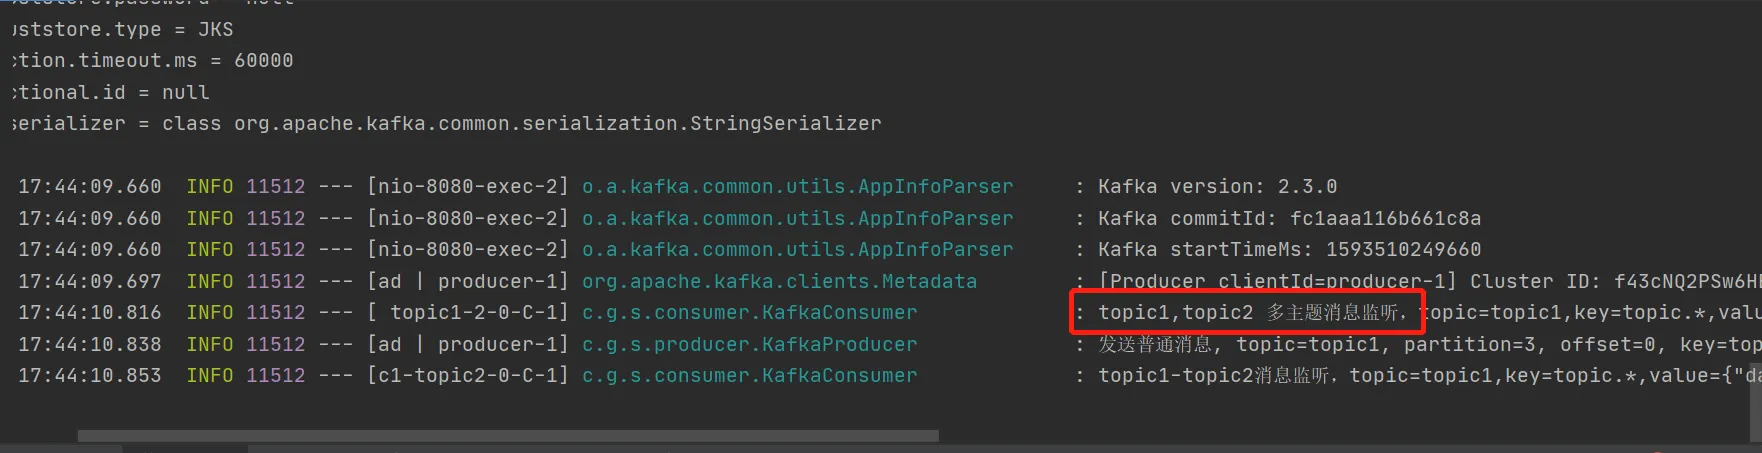
4. 多主题订阅
消费者:
java@KafkaListener(id = "topic1-2", topics = {"topic1", "topic2"})
public void listen2(ConsumerRecord<?, ?> record) {
    log.info("topic1, topic2 多主题消息监听,topic={},key={},value={}", record.topic(), record.key(), record.value());
}
结果:
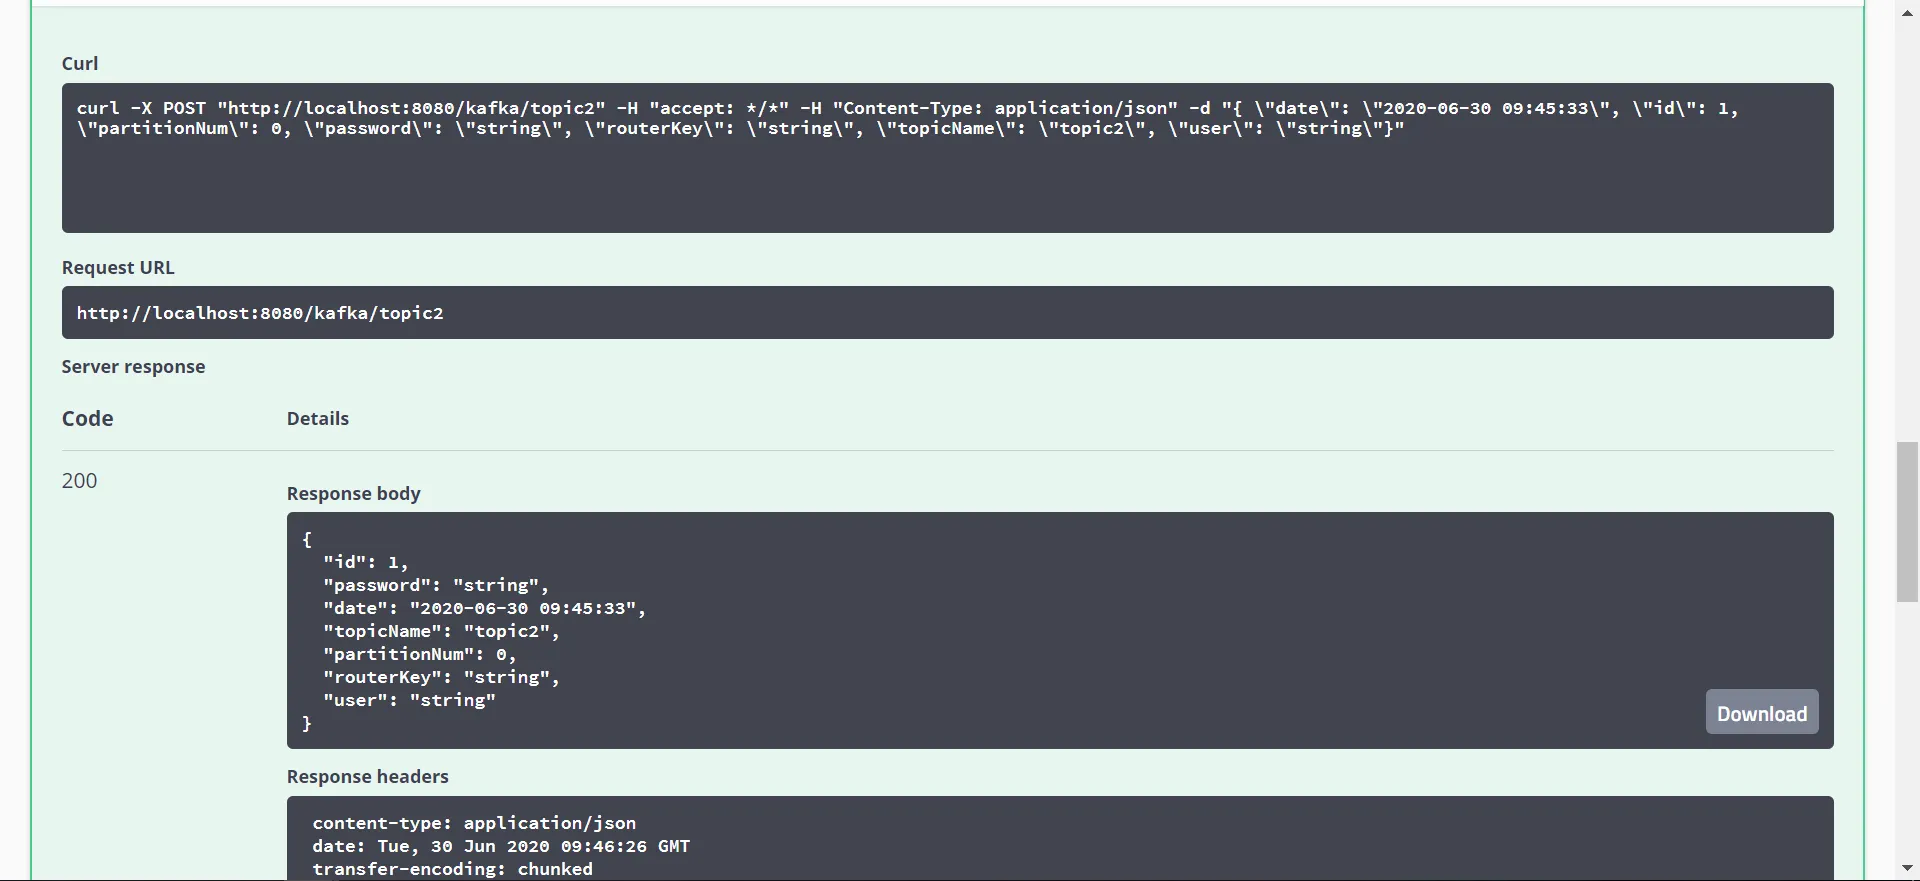
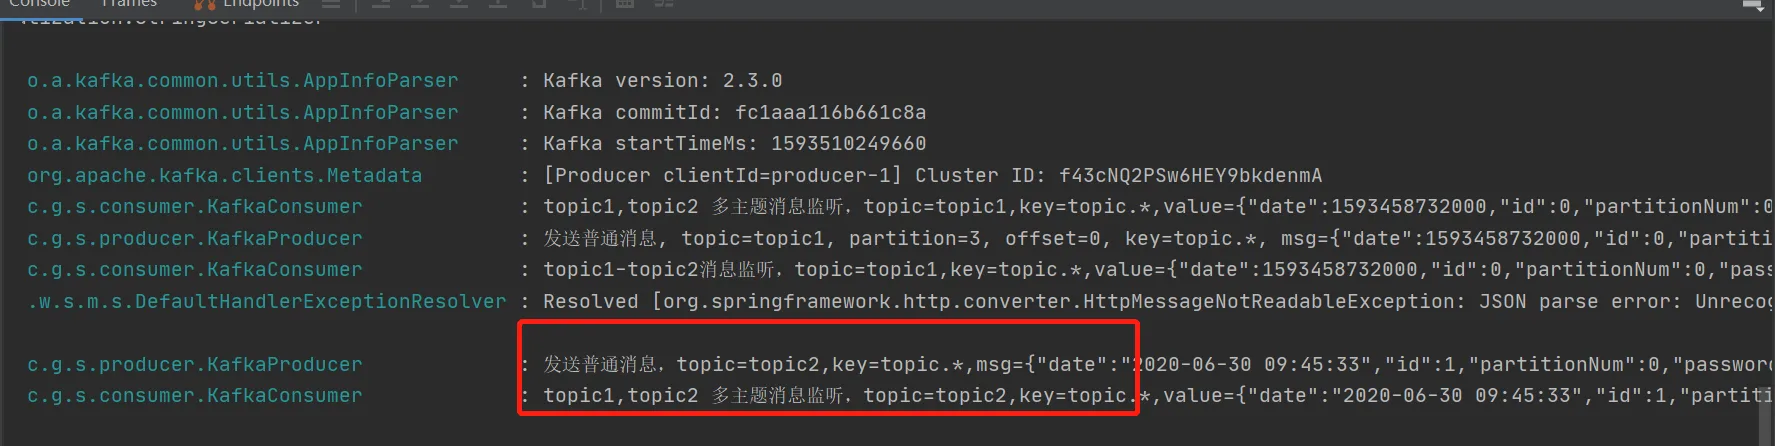
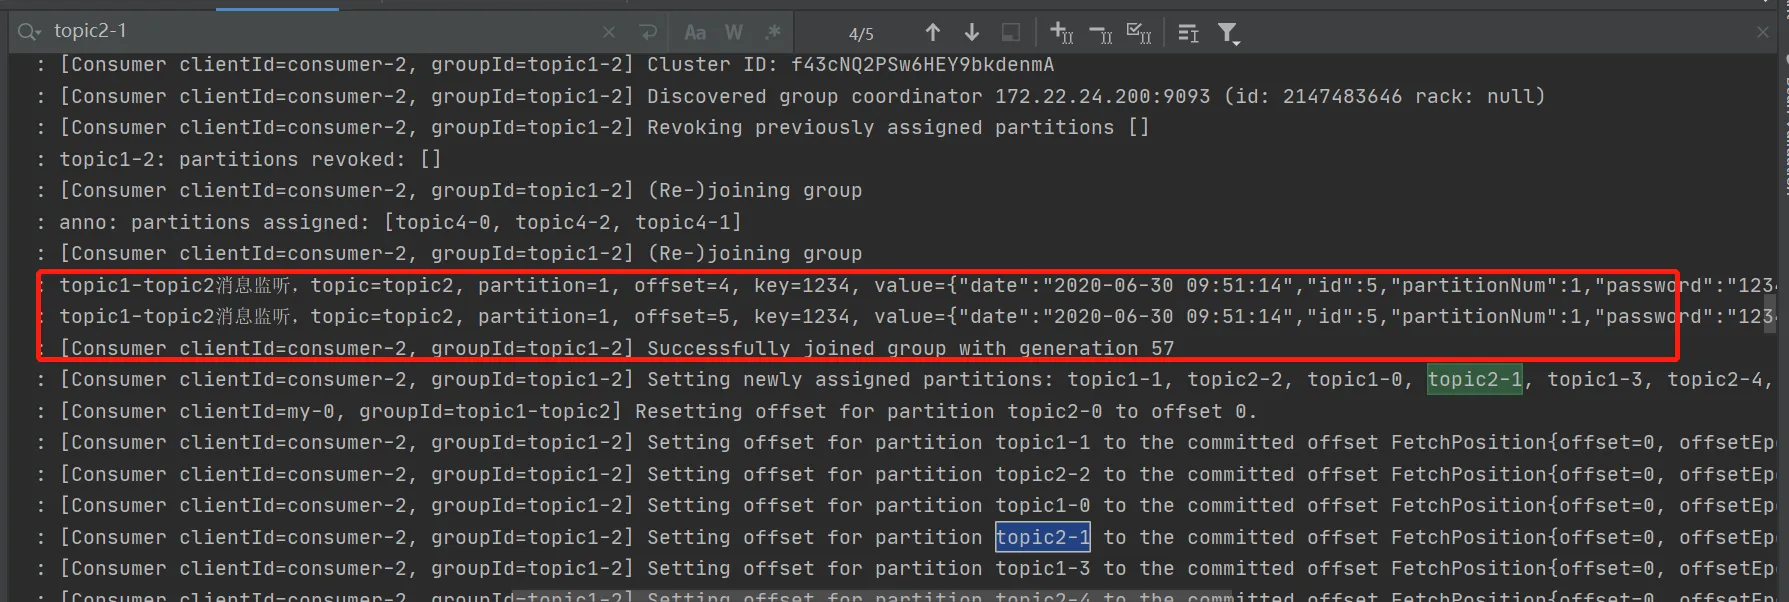
5. 多主题指定分区指定偏移量订阅
消费者:
java/**
 * id是消费者监听容器
 * 配置topic和分区:监听两个topic,分别为topic1、topic2,topic1只接收分区0,3的消息,
 * topic2接收分区0和分区1的消息,但是分区1的消费者初始位置为5
 *
 * @param record 消费内容
 */
@KafkaListener(id = "topic1-topic2", clientIdPrefix = "my",
        topicPartitions =
                {
                        @TopicPartition(topic = "topic1", partitions = {"0", "3"}),
                        @TopicPartition(topic = "topic2", partitions = "0",
                                partitionOffsets = @PartitionOffset(partition = "1", initialOffset = "4"))
                })
public void listen(ConsumerRecord<?, ?> record) {
    log.info("topic1-topic2消息监听,topic={},key={},value={}", record.topic(), record.key(), record.value());
}
控制台:
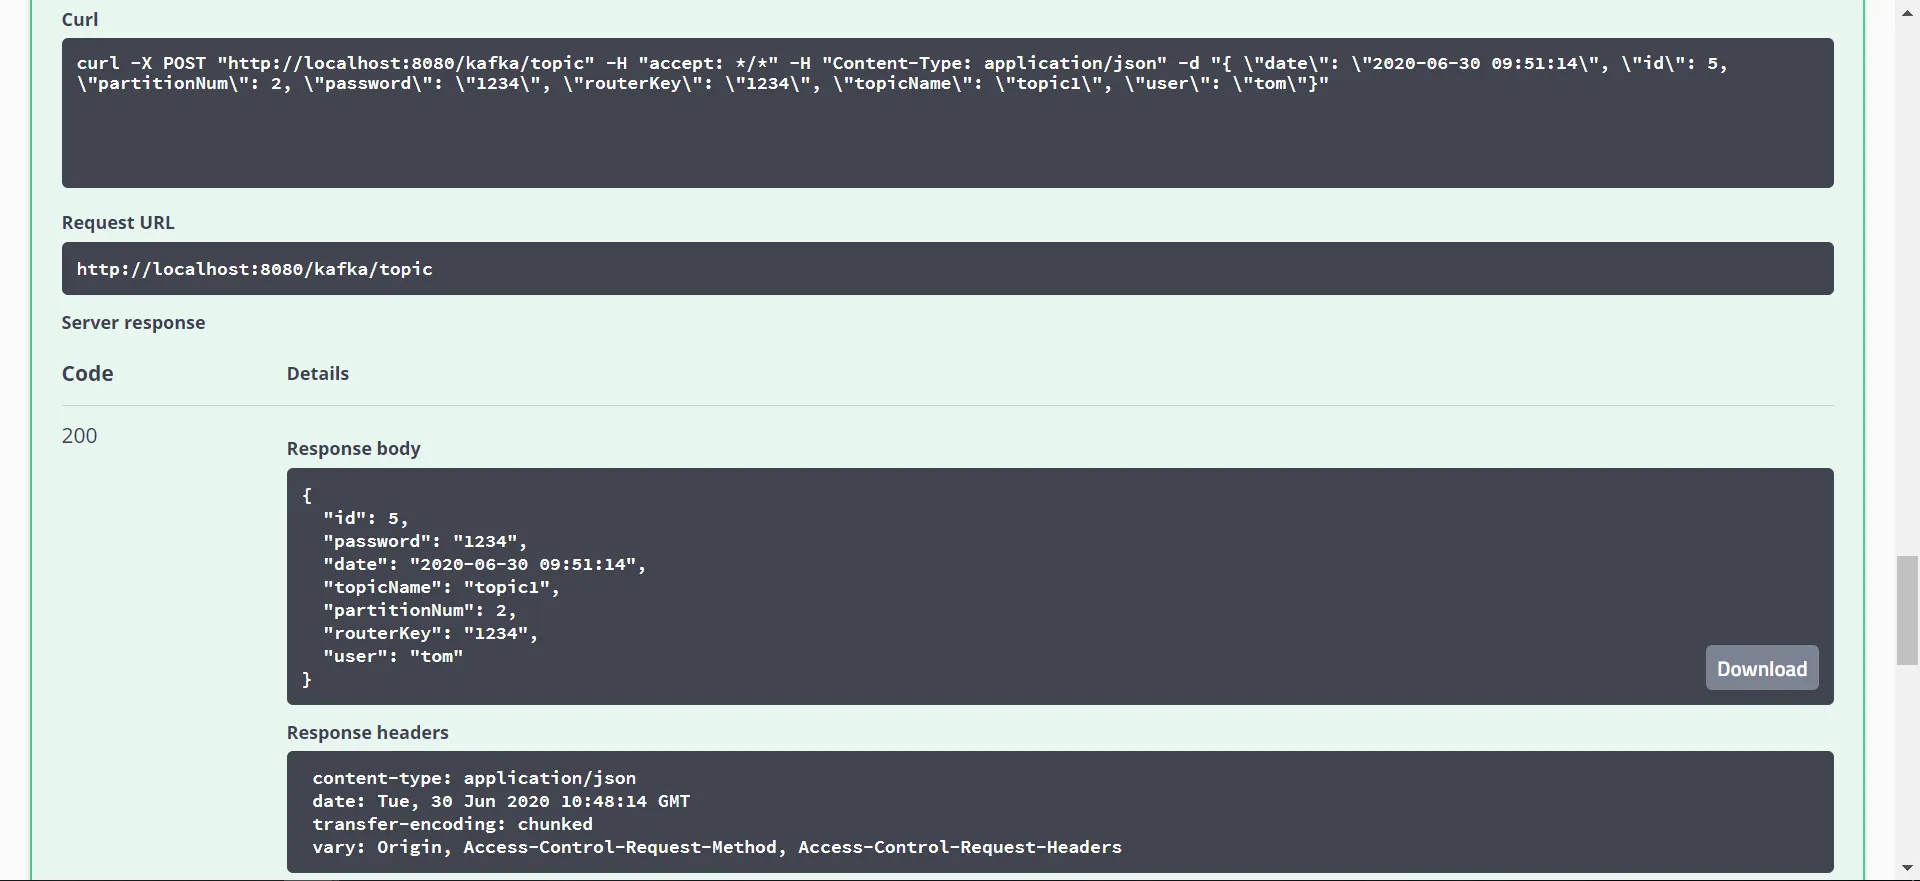

向topic1的分区2中发送消息,topic1-topic2未监听到,因为我们只监听了topic1的 0 3分区,topic2的 0 1分区。
自定义offset:auto.offset.reset="earliest"时会从设置的initialOffset开始消费

本文作者:CodeJump
本文链接:
版权声明:本博客所有文章除特别声明外,均采用 BY-NC-SA 许可协议。转载请注明出处!